README file from
GithubCoin Memo — Obsidian Expense Tracker
A daily expense tracking plugin for Obsidian that automatically recognizes and tallies accounting records from your daily notes. Supports one-tap bill import via screenshot OCR.
Features
| Feature | Description |
|---|---|
| 🔍 Auto-detection | Parses expense records from daily notes automatically |
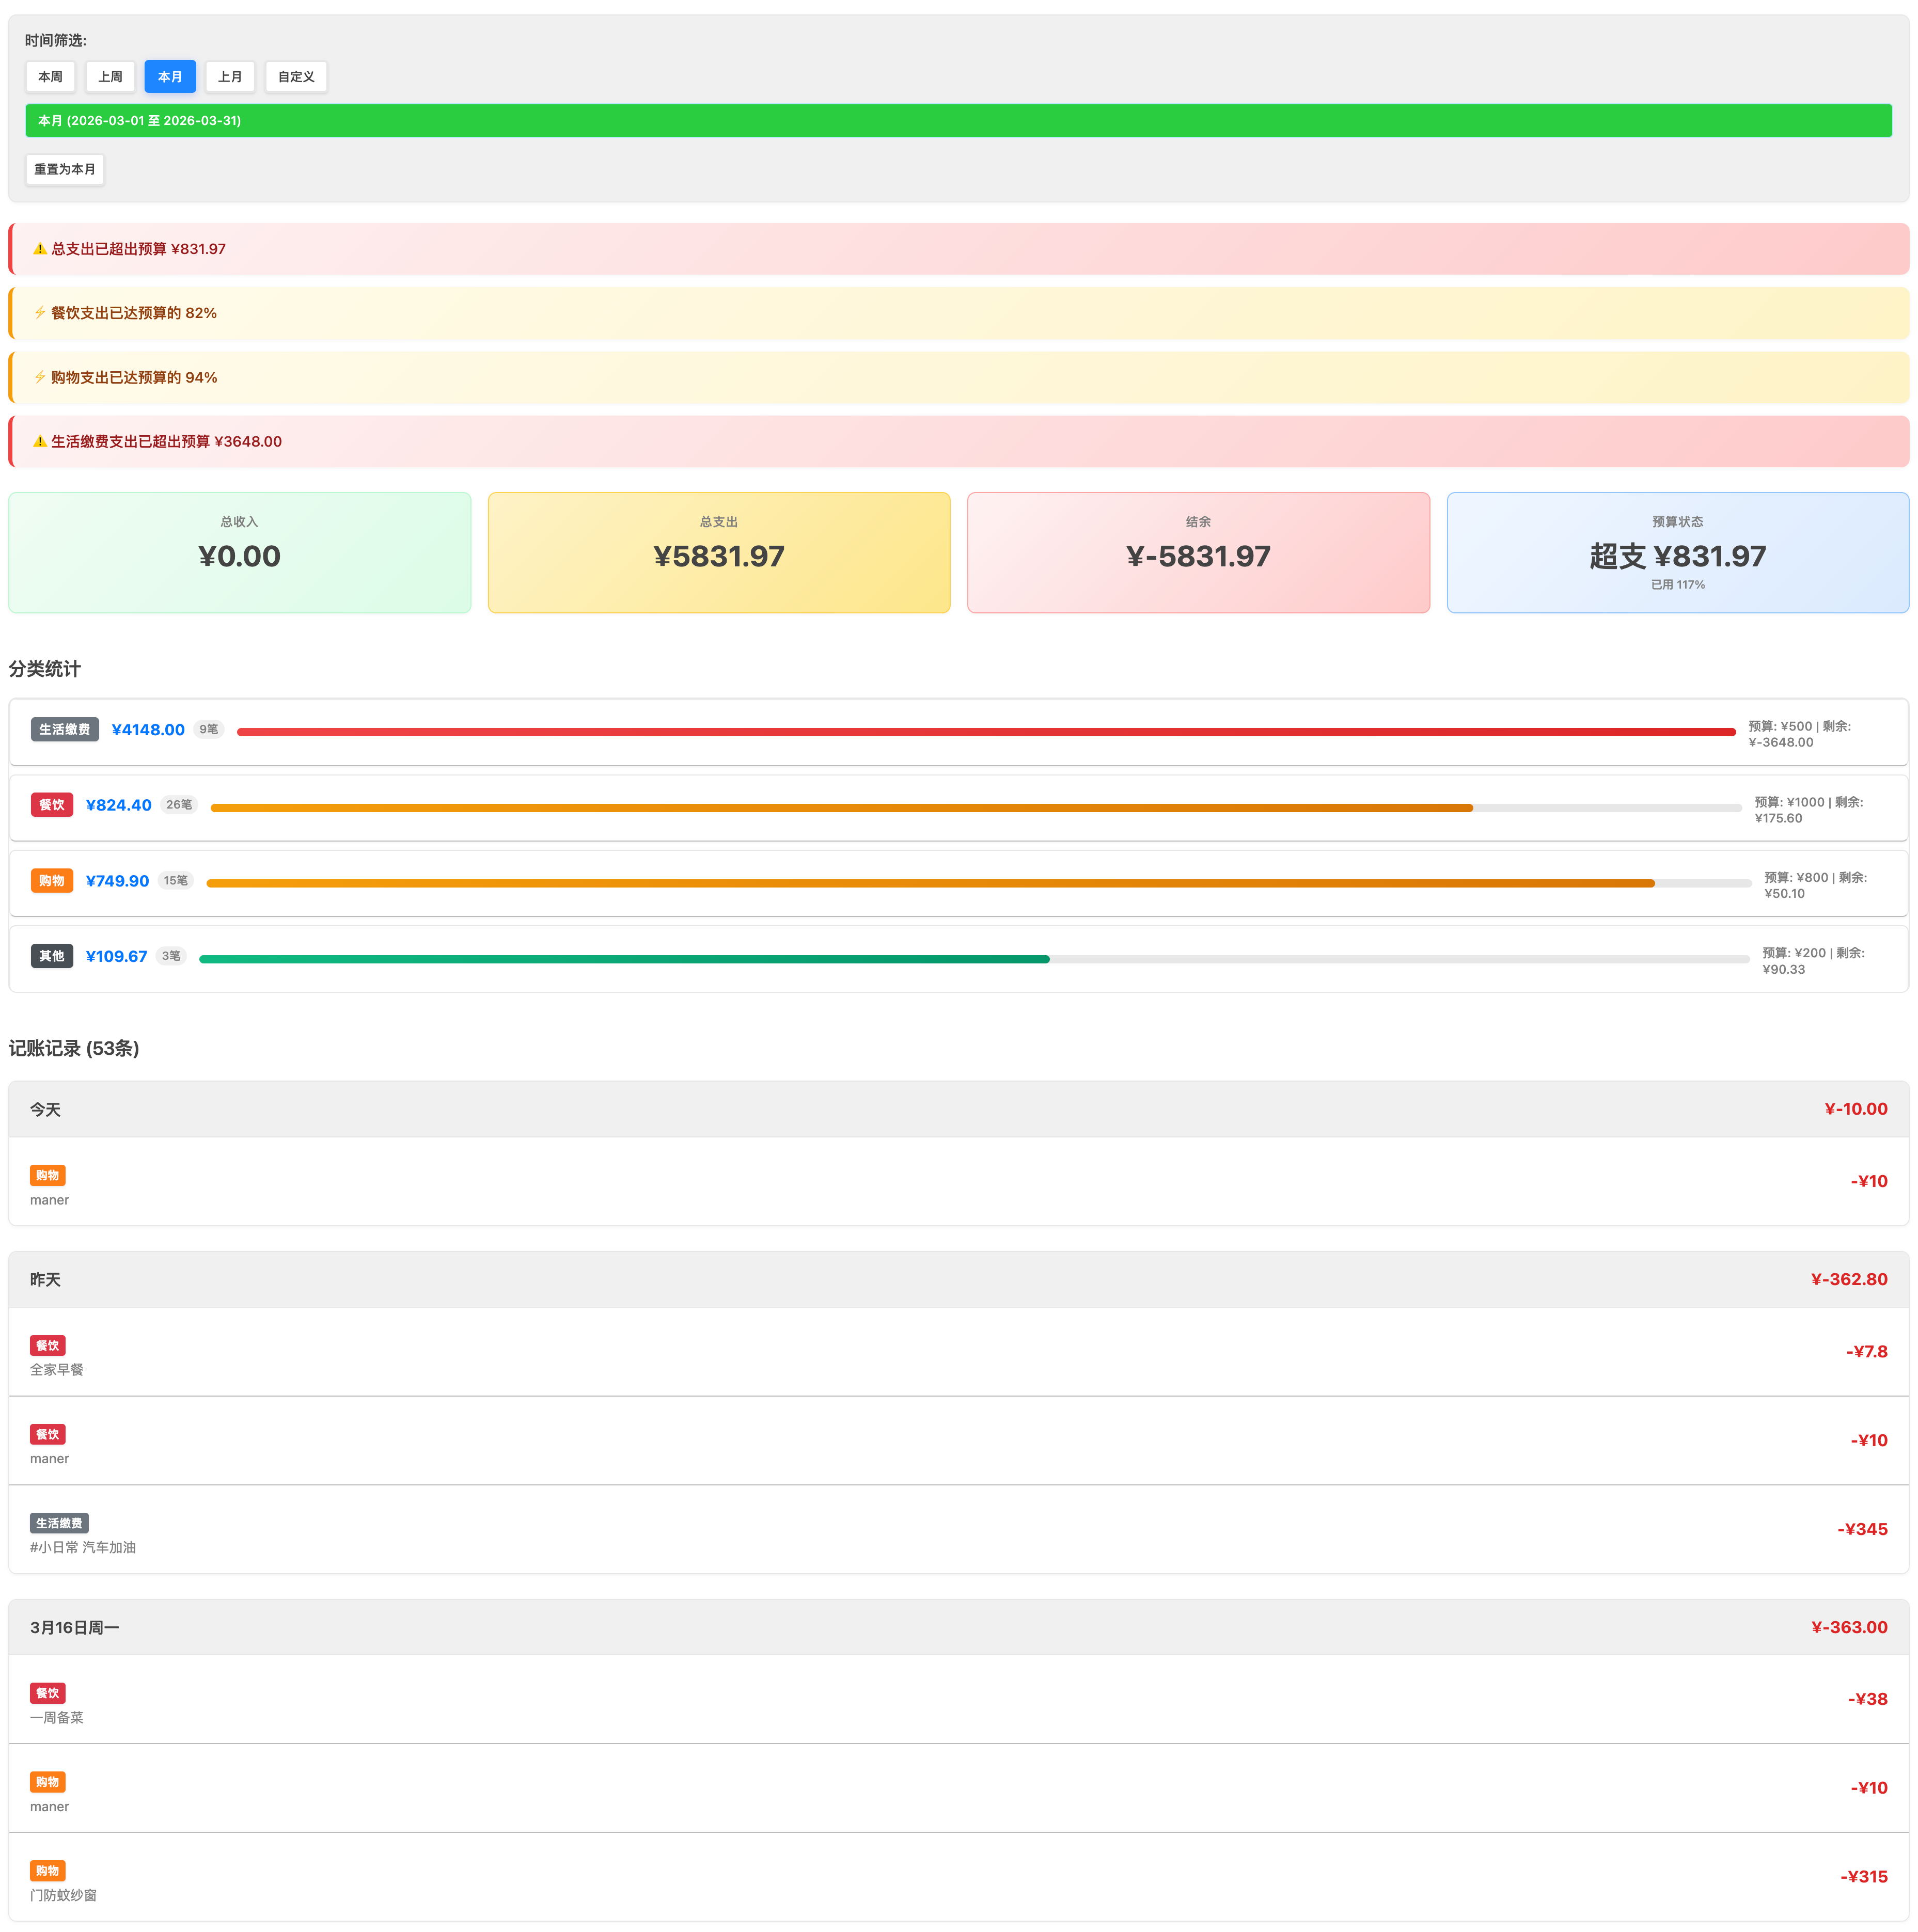
| 📊 Statistics | Income/expense summaries, category breakdowns, date-range queries |
| 🏷️ Category management | Custom keyword-to-category mapping |
| 📅 Date filter | View records by date range |
| 💰 Income & expenses | Track income and spending separately, calculate balance |
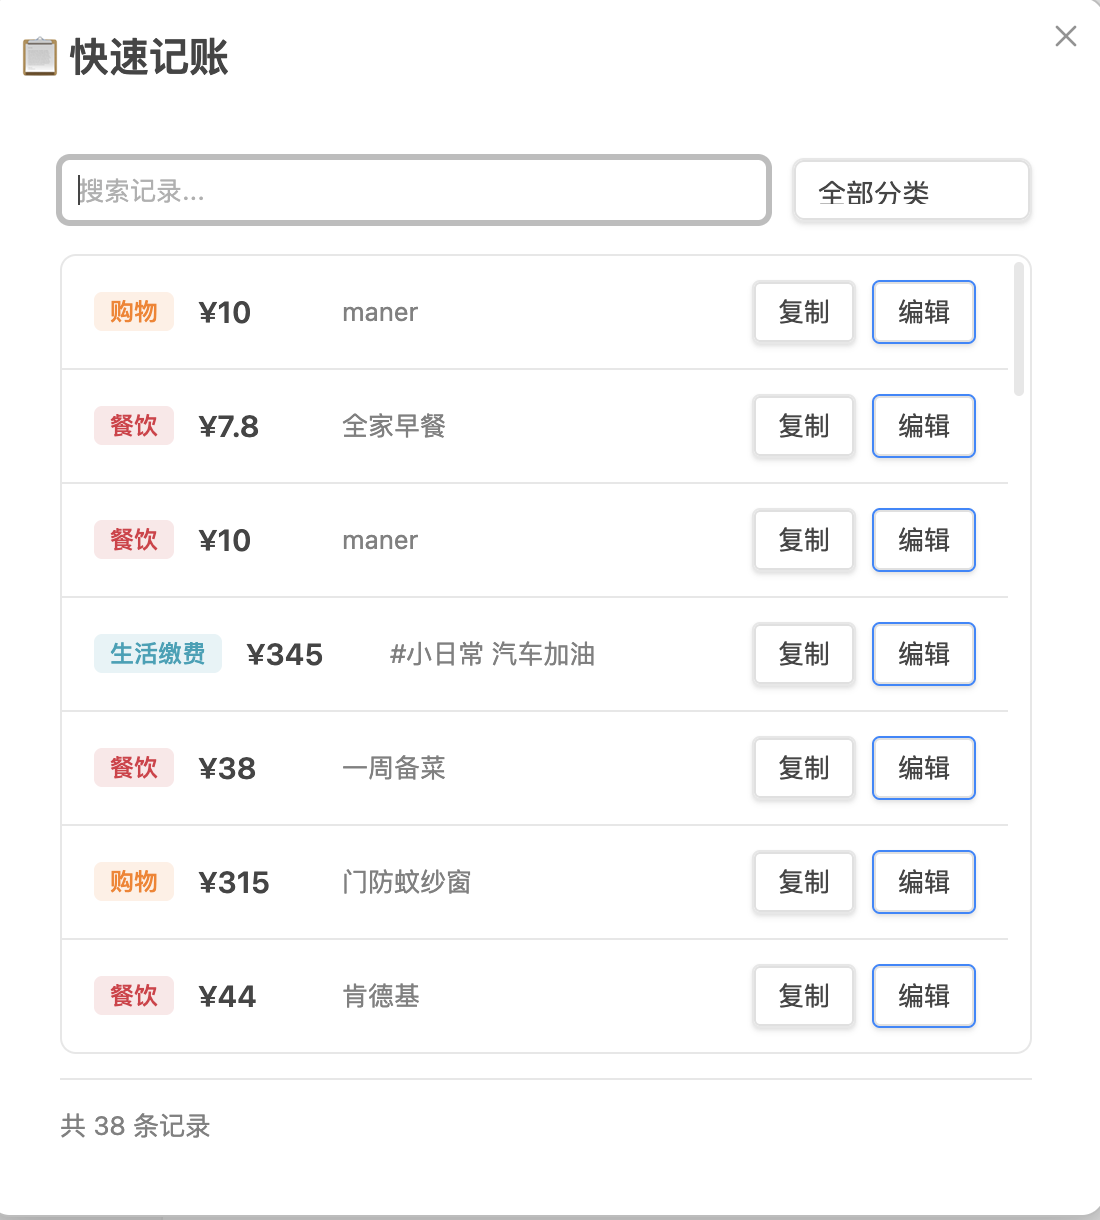
| 📋 Quick copy | Copy a past record to today with one tap |
| 🧾 Bill screenshot import | OCR text written to bill.md, auto-parsed into records |
| 📄 Export | Export to PDF or Markdown |
| 🔄 Batch reclassify | Bulk-correct categories by note keyword, with auto-run support |
Installation
Option 1: From Obsidian Community Plugins (Recommended)
Open Obsidian Settings → Community Plugins → Browse, and search for Coin Memo or fengshuzi to install directly.
Option 2: From GitHub Release (recommended)
- Go to the Releases page and download the latest version.
- Download
main.js,manifest.json,styles.css, andconfig.json. - Create the plugin folder in your vault:
.obsidian/plugins/coin-memo/. - Copy the downloaded files into that folder.
- Restart Obsidian and enable Coin Memo in Settings → Community plugins.
Option 3: Build from source
cd /path/to/your/vault/.obsidian/plugins
git clone https://github.com/fengshuzi/coin-memo.git
cd coin-memo
npm install && npm run build
Quick Start
Step 1: Configure the journal folder
Open Settings → Community plugins → Coin Memo, and set the journal folder path (default: journals).

Step 2: Add records in your daily note
In journals/2024-01-10.md:
- #cy Tofu 15.5
- #cy Spicy hotpot 45
- #gw Supermarket 128
- #sr Salary 8500
Step 3: View statistics
Click the calculator icon in the left sidebar to open the expense tracker view.
Record Format
Basic syntax
#keyword description amount
Format rules
- ✅ Description first, amount last (recommended)
- ✅ Amount can also come first
- ✅ Currency symbols (¥, 元, 块) are ignored automatically
- ✅ When a line contains multiple numbers, the first number is used as the amount
Default keywords
| Keyword | Category | Note |
|---|---|---|
cy |
Dining | Food & drinks |
gw |
Shopping | Online & in-store |
dk |
Loans | Mortgage, auto loans |
jf |
Utilities | Water, electricity, gas, internet |
qt |
Other | Uncategorized expenses |
sr |
Income ⭐ | Special keyword — marks income |
Quick Copy
Quick Copy lets you duplicate a past record to today — handy for recurring expenses.
How to open
| Method | Instructions |
|---|---|
| Sidebar icon | Click the 📋 icon |
| Command palette | Cmd/Ctrl + P → "Quick Copy" |
| Advanced URI | obsidian://advanced-uri?vault=VaultName&commandid=coin-memo:quick-copy |
Workflow
- A modal opens showing records from the last 14 days (auto-deduplicated).
- Search or filter by category.
- Click "Copy" to write the record to today's note as-is, or "Edit" to modify first.
- Your today's daily note opens automatically.
iOS: Back Tap shortcut
- Install the community plugin Obsidian Advanced URI.
- Create a Shortcuts action that opens:
obsidian://advanced-uri?vault=VaultName&commandid=coin-memo:quick-copy - Go to Settings → Accessibility → Touch → Back Tap and assign the shortcut.
Bill Screenshot Import
Screenshot from WeChat / bank app → Shortcuts OCR → write to bill.md → run command to auto-import
Workflow
Payment screenshot
  ↓ iOS Shortcuts (OCR)
journals/bill.md
  ↓ Command "Import from Bill"
Auto-parse → confirmation dialog → write to today's note → delete bill.md
bill.md format
Multiple records separated by ###. The plugin only parses the last section:
20:58
5G
豆磨坊(**飞)
·19.40
完成
###
12:42
Manner
使用建设银行储蓄卡(0511)支付
·10.00
完成
Supported screenshot types
| Type | Detection pattern |
|---|---|
| 💚 WeChat Pay success page | Contains "支付成功" or "返回商家" |
| 💚 WeChat Pay bill page | Contains "我的账单" + "支付服务" |
| 💙 Alipay success page | Contains "完成" + "付款方式" |
| 🟡 CCB transaction alert | Contains "动账提醒" or "变动提醒" |
Merchant auto-classification
Open Settings → Bill Import — Merchant Auto-Classification. One rule per line:
merchant_keyword=category_keyword=description
Example:
豆磨坊=cy=买豆腐
麦当劳=cy=麦当劳
盒马=gw=买菜
物业=jf=物业费
- Merchant keyword: matched via substring (no exact match needed).
- Description: optional; if omitted, the description field in the dialog is left blank.
💡 Run an import once without configuring mappings first — the dialog shows the actual OCR merchant text, which you can then use as the key.
Triggering the import
| Method | Action |
|---|---|
| Command palette | Cmd/Ctrl + P → "Import from Bill" |
| Advanced URI | obsidian://advanced-uri?vault=VaultName&commandid=coin-memo:bill-import |

Commands
Open the command palette with Cmd/Ctrl + P:
| Command | Command ID | Description |
|---|---|---|
| Open Daily Accounting | open-accounting |
Open the expense tracker view |
| Refresh Accounting Data | refresh-accounting |
Re-scan daily notes |
| New Entry | quick-entry |
Open the new-entry dialog |
| Quick Copy | quick-copy |
Open the quick-copy dialog |
| Import from Bill | bill-import |
Parse bill.md and show confirmation |
| Export PDF | export-pdf |
Export the current view as PDF |
| Export Markdown | export-markdown |
Export the current view as Markdown |
| Batch Reclassify | reclassify |
Open the batch reclassify page |
Advanced URI format:
obsidian://advanced-uri?vault=VaultName&commandid=coin-memo:<command-id>
Batch Reclassify
Use case: many records are imported via screenshot OCR and default to
#cy. You need to bulk-correct categories based on the description text.
How to open
Click the "Batch Reclassify" button in the tracker view toolbar, or run the command from the palette. It opens in a new tab so it doesn't disrupt the current view.
Workflow
- Add a rule: Click "+ Add Rule" and fill in the note keyword and target category.
- Preview: Click "Preview" to scan all daily notes and show matching records grouped by rule.
- Select: All records are selected by default; uncheck any you don't want to change.
- Execute: Click "Execute" and confirm — changes are written to the files.
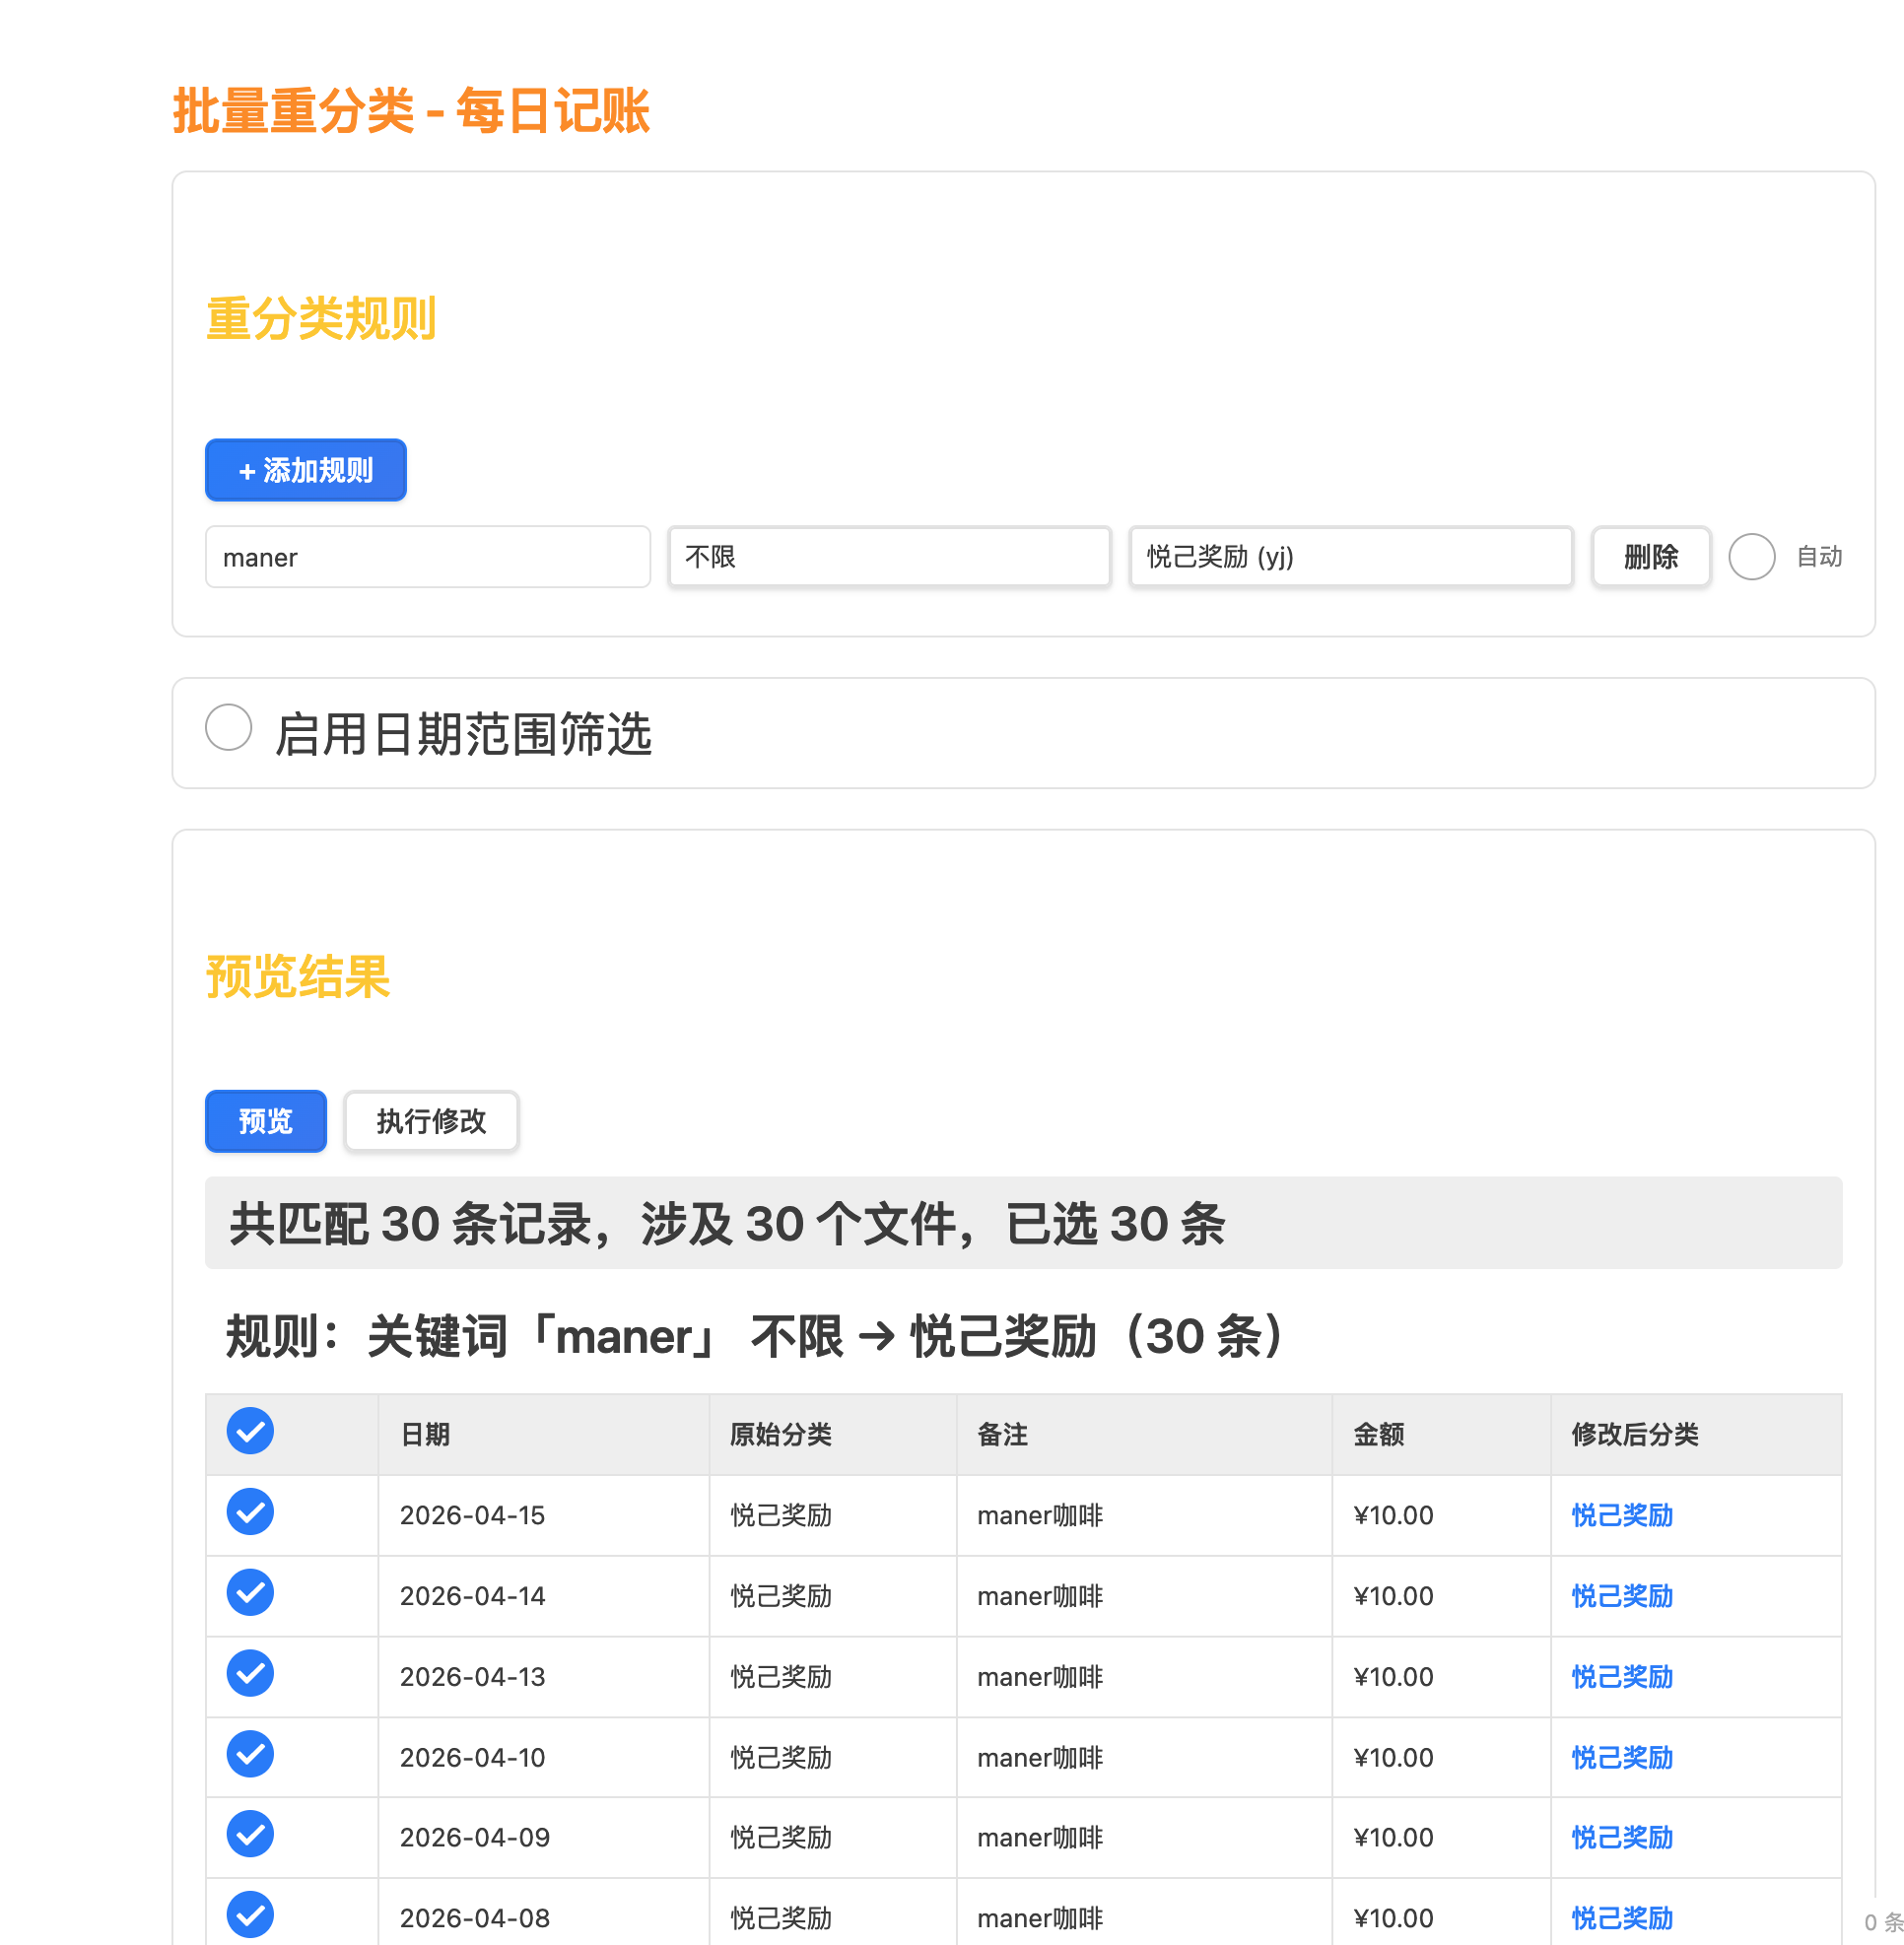
Rule fields
| Field | Description |
|---|---|
| Note keyword | If the note contains this keyword (case-insensitive), the rule matches |
| Target category | The category to change to |
| Auto | When checked, the rule runs silently each time the tracker view opens (only affects the last 7 days) |
Example: note contains maner → change category to 悦己奖励 (yj)
Auto-classify
When the "Auto" checkbox is enabled, the rule runs silently every time you open the tracker view:
- Only processes records from the last 7 days, so historical data is untouched.
- If the target category is already correct, the file is not modified (preserves timestamps).
- Shows a notification: "Auto-classify complete: X records updated."
Date range filter
Enable "Date range filter" to limit manual preview/execution to a specific date range, preventing accidental changes to older records.
Export
Export PDF
Click "Export PDF" in the tracker view, choose a date range, and export. The PDF includes a summary, category totals, and detailed records.
Export Markdown
Click "Export MD" to generate a Markdown-formatted expense report.
FAQ
Q: No records showing up?
Check that your daily notes are in the configured folder, filenames follow YYYY-MM-DD.md, and the record format is correct.
Q: How do I add a new category? Click the "Configure Categories" button in the tracker view.
Q: Where is my data stored? All data lives in your Obsidian notes (daily note files + config.json) — fully local.
Q: What if bill.md gets deleted accidentally?
It is only deleted after you confirm the import or when parsing fails. Check the developer console (Cmd+Option+I) for [bill-import] logs if needed.
Q: OCR merchant name doesn't match the actual name? Use the text shown in the import dialog to configure your merchant keyword — OCR may produce slight errors.
Development
npm run dev      # Watch mode with sourcemaps
npm run build    # Production build
npm run deploy   # Deploy to local vaults
npm run release  # Publish to GitHub
License
MIT
☕ Support the author
If this plugin helps you, consider buying me a coffee!
💡 Tip: The hardest part of tracking expenses isn't the method — it's consistency. By integrating bookkeeping into your daily notes, recording spending becomes a natural extension of journaling.